8 Tips For Boosting Your Repair Window Game


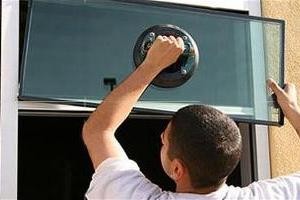
How to Repair a Broken Window
Broken window glass can be caused by a hurricane or a child kicking an object. It could cause more problems, such as leakage of water or a draft which increases your energy costs.
There are many ways to repair the crack, based on the size of the crack. Here are a few options to think about:
Tape
A tape that's old-fashioned can be used to temporarily repair cracks in your windows. It's cheap, easy to use, and can be used effectively. Make sure you cover both sides of the crack to ensure that it's as secure as you can. This will decrease the amount of air that could be able to enter the window and cause damage to the glass or even shatter. Clear tape is a great option since it looks much nicer than duct tape, and doesn't leave a sticky residue when you take it off.
window repairs near me can also purchase specialized adhesive tape from the majority of hardware stores. It is available in 2 x 30' lengths and creates an invisible patch that will prevent the crack or tear from spreading further. This can be useful for boat enclosure windows, tent or RV vinyl windows and even soft top car windows. It's easy to install and doesn't require any special tools or expertise. Cut the appropriate size, take off the release paper, and apply it. It is UV and salt water resistant and is made of a strong material that is able to stand up to the harshest conditions. This can help you save money by preventing you from having to purchase an entire window replacement.
Super Glue
Utilizing super glue as a repair tool is a quick fix for small cracks and chips in glass. These adhesives bind with hydroxyl ions on the glass's surface and create a firm grip in just a few seconds. These glues can also be used to attach ceramic, metal, or wood to glass. They are able to withstand heat and moisture. If you're working on the size of a project, it's worth investing in silicone or epoxy to ensure a stronger hold and faster drying time.
It is important to clean and dry the surface prior to applying any kind of glue to a window that has been damaged. It is important to get rid of any debris and ensure that both surfaces are clean and dry. It could be beneficial to roughen up the surface well, particularly if it's extremely smooth. A slight sanding will give the adhesive a larger surface area to adhere to, which results in an even stronger bond.
When you are ready begin the actual repair, it's essential to use a product that is specifically designed for glasses. This will ensure that the glue is safe to use and doesn't leave any ugly marks or marks. Select a clear glue that will turn transparent after it has dried. Avoid glues that expand after they dry, as this can cause cracks in glass.
You'll also need to consider how the glass will be used. If it will be kept in a closed space and not be subjected to excessive stress, then a basic super glue will work fine. If the glass will be part of an windscreen, it's recommended to make use of a weatherproof adhesive.
Super glues typically take a few seconds to bond, however, they may have different cure times. It is essential to read the directions carefully as some require chemical accelerators in order to accelerate the drying process. It's recommended to work in a well-ventilated area and open all windows to increase air circulation, since this will help the glue to dry faster. In addition, you can always make use of a fan to improve the air flow around your work area, which will help the glue to dry more quickly.
Glass Repair Film
Glass repair film is an effective and practical way of making cracked windows safe until they can be repaired professionally or replaced. Anyone can put it in place, even if they are not a skilled tradesman. It's simple to do and quick. It costs much less than a conventional window glass board-up and will keep the heat in while keeping the rain out. It gives the appearance of a glass window and is ideal for hospitals, schools and offices.
The sharp shards left behind by a window that has been broken can cause serious injury and even death. Safety window films are made with a strong adhesive to make broken glass less risky. They also hold the shards inside the film. The film is translucent, so light can still flow through the window, and it's more attractive than a boarding-up - especially in businesses that depend on the presence of customers at their premises.
The film is easily cut with a knife or scissors. It is backed by a peelable backing that has a grid printed on it to help with cutting. It can be positioned on either side of the window and when there is an uneven surface it can be overlapped by 10cm for additional security.
There are different types of safety window films that are available depending on the type of breakage. Amber safety films are recommended for bullseye and other breaks that have many tiny cracks. Gray safety films are recommended for star breaks. The films are best applied to clean glass that is moist and it is recommended to employ a squeegee made of polyethylene with soap solution to apply the film. Once the film has stuck to the glass it is best to let it dry for a few days.
This high-quality self-adhesive film is designed to strengthen and weatherproof damaged or broken glass until a permanent repair can be found. It is utilized in a variety of industries and is made by Eastman Films, who have many years of experience in the production of high-quality safety and security window films throughout the world. The film is offered in 15 metre long x 914mm wide rolls and comes complete with a backing paper as well as a release liner.
Paint
When painting a window it is essential to complete a thorough job. This will help the new coat of paint appear nice and also let it adhere properly. Before starting, make sure that the window is clean and scraped to get rid of any paint or wood that are sagging or decayed. It is also important to take out all hardware such as handles and latches. It is also important to remove the sanding from the surface that you intend to paint. This will create a smooth surface on which the primer and paint will bond with.
It is important to protect the surrounding areas of the window with plastic sheeting and painters tape. This will prevent paint from getting onto areas that aren't supposed to be painted. I like to use green frog tape to do this as it provides an even line and makes it easy to take off when the time arrives. It's also an excellent idea to apply painters tape for any edges that are delicate that connect to the wall surfaces.
After the window has been secured and the window is secured, it's time to begin the actual painting process. You'll need to apply a few coats of primer, and allow each one to dry before proceeding. After you've finished priming process, it's an excellent idea to give the entire area an easy sanding using fine-grit Sandpaper. This will help make the surface smooth for the next coat of paint and will also help in removing any dust that may have accumulated.
You will need to wait until the oil-based or acrylic primers or paints have completely dried before you begin painting. This can take up to an entire day, depending on the brand that you are using.
When the primer and paint are fully dry, it's time to paint. Paint the rails (horizontals first) prior to the stiles (verticals). This will prevent paint drips from getting to the glass. Also, make sure you keep a damp cloth handy to wipe away any paint drips as quickly as they happen.